Difference between revisions of "Lustre Intel: Install IEEL 1.0.0"
| Line 223: | Line 223: | ||
</syntaxhighlight> | </syntaxhighlight> | ||
| + | == Check out the SCSI Connectivity == | ||
Some notes about the failover pair of drives on the VM in the lab | Some notes about the failover pair of drives on the VM in the lab | ||
<syntaxhighlight> | <syntaxhighlight> | ||
| Line 248: | Line 249: | ||
sd 2:0:0:0: Attached scsi generic sg0 type 0 | sd 2:0:0:0: Attached scsi generic sg0 type 0 | ||
sd 2:0:0:1: Attached scsi generic sg1 type 0 | sd 2:0:0:1: Attached scsi generic sg1 type 0 | ||
| + | </syntaxhighlight> | ||
| + | |||
| + | Take a look at the SCSI devices on the nodes | ||
| + | <syntaxhighlight> | ||
| + | root@st15-oss2 ~]# cat /proc/scsi/scsi | ||
| + | Attached devices: | ||
| + | Host: scsi2 Channel: 00 Id: 00 Lun: 00 | ||
| + | Vendor: QEMU Model: QEMU HARDDISK Rev: 1.5. | ||
| + | Type: Direct-Access ANSI SCSI revision: 05 | ||
| + | Host: scsi2 Channel: 00 Id: 00 Lun: 03 | ||
| + | Vendor: QEMU Model: QEMU HARDDISK Rev: 1.5. | ||
| + | Type: Direct-Access ANSI SCSI revision: 05 | ||
| + | Host: scsi2 Channel: 00 Id: 00 Lun: 02 | ||
| + | Vendor: QEMU Model: QEMU HARDDISK Rev: 1.5. | ||
| + | Type: Direct-Access ANSI SCSI revision: 05 | ||
| + | Host: scsi2 Channel: 00 Id: 00 Lun: 01 | ||
| + | Vendor: QEMU Model: QEMU HARDDISK Rev: 1.5. | ||
| + | Type: Direct-Access ANSI SCSI revision: 05 | ||
| + | </syntaxhighlight> | ||
| + | |||
| + | Have a look at the devices | ||
| + | <syntaxhighlight> | ||
| + | [root@st15-oss2 ~]# cat /proc/scsi/sg/device_strs | ||
| + | QEMU QEMU HARDDISK 1.5. | ||
| + | QEMU QEMU HARDDISK 1.5. | ||
| + | QEMU QEMU HARDDISK 1.5. | ||
| + | QEMU QEMU HARDDISK 1.5. | ||
| + | </syntaxhighlight> | ||
| + | |||
| + | Have a look at the sg map (mapping between devices and linux sg) | ||
| + | <syntaxhighlight> | ||
| + | [root@st15-oss2 ~]# sg_map | ||
| + | /dev/sg0 /dev/sda | ||
| + | /dev/sg1 /dev/sdb | ||
| + | /dev/sg2 /dev/sdc | ||
| + | /dev/sg3 /dev/sdd | ||
</syntaxhighlight> | </syntaxhighlight> | ||
Revision as of 16:55, 29 January 2014
Downloaded ieel-1.0.0.tar.gz from the Intel Software Centre (product needs to be registered per user, get packages on headnode:/home/david/software/ieel)
Install the IML Master
  [root@st15-iml1 ~]# tar zxvf ieel-latest.tar.gz
  ieel-1.0.2/install
  ieel-1.0.2/lesskey.out
  ieel-1.0.2/EULA.txt
  ieel-1.0.2/base_managed.profile
  ieel-1.0.2/base_monitored.profile
  ieel-1.0.2/lustre-client-2.4.0-bundle.tar.gz
  ieel-1.0.2/iml-manager-2.0.2.0.tar.gz
  ieel-1.0.2/e2fsprogs-1.42.3.wc3-bundle.tar.gz
  ieel-1.0.2/iml-agent-2.0.2.0-bundle.tar.gz
  ieel-1.0.2/lustre-2.3.11-bundle.tar.gz
  ieel-1.0.2/hadoop/
  ieel-1.0.2/hadoop/hadoop-lustre-plugin-2.0.4-Intel.tar.gz
Run the installation script
[root@st15-iml1 ieel-1.0.2]# ./installCheck the Installation log while you install (once the installer kicks off, it'll create a directory /var/log/chroma
[root@st15-iml1 chroma]# tail -f /var/log/chroma/install.log
[29/Jan/2014:07:39:44] DEBUG 0.000101:  policycoreutils         x86_64  2.0.83-19.39.el6         base            648 k
[29/Jan/2014:07:39:44] DEBUG 0.000102:  sg3_utils-libs          x86_64  1.28-5.el6               base             51 k
[29/Jan/2014:07:39:44] DEBUG 0.000082:
[29/Jan/2014:07:39:44] DEBUG 0.000129: Transaction Summary
[29/Jan/2014:07:39:44] DEBUG 0.000103: ================================================================================
[29/Jan/2014:07:39:44] DEBUG 0.000089: Install     102 Package(s)
[29/Jan/2014:07:39:44] DEBUG 0.000089: Upgrade       4 Package(s)
[29/Jan/2014:07:39:44] DEBUG 0.000082:
This is what you'll see during the Installation (provide a user and email)
Starting Intel(R) Manager for Lustre* software installation
Testing YUM
Loaded plugins: fastestmirror
Unpacking installation package
Installing Intel(R) Manager for Lustre*
|
Starting setup...

Setting up PostgreSQL service...
Creating database owner 'chroma'...

Creating database 'chroma'...

Creating database tables...
Loaded 11 default power device types.
Creating groups...
An administrative user account will now be created using the credentials which you provide.
Username: admin
Email: david.power@boston.co.uk
Password:
Confirm password:
User 'admin' successfully created.
Building static directory...
NTP Server [localhost]:
Writing ntp configuration: localhost
Opening firewall for ntp
Restarting ntp
Starting RabbitMQ...
Restarting rabbitmq-server: RabbitMQ is not running
SUCCESS
rabbitmq-server.
Creating RabbitMQ user...
Creating RabbitMQ vhost...
Enabling daemons
Starting daemons
Checking service configuration...

Setup complete.
Registering profiles
chroma-manager 2.0.2.0-3424 is currently installed

Intel(R) Manager for Lustre* software installation completed successfully
Intel IML is installed! Lets go to the IML web interface
  https://206.221.159.56:8015/ui/
  # by default, the port will be 8080
Verify the Installation files/directories:
- /usr/bin/chroma - Command Line Interface
- /var/log/chroma - IML log files
- /var/lib/chroma/repo - IML repository
- /usr/lib/pyhthon2.6/site-packages
- /usr/share/chroma-manager - IML Files
Check the chroma processes that are running
ps -ef | grep chromaPrepare the Rest of the Cluster
Make sure all the below is followed:
- Install a vanilla Centos 64 for all the OSS and MDS nodes
- Ensure ssh keys are setup between all the hosts (from IML head to all nodes)
- Ensure all the hosts files are consistent (FQDN resolutions)
- Create an LNET configurations (See below)
- Ensure High Availability cables are installed
- NTP setup and running on the IML head (Note: Someone reported problems with NTP when running on a VM, dont do)
Create the /etc/modprobe.d/lustre.conf
# For Ethernet
[root@st15-mds1 ~]# cat /etc/modprobe.d/lustre.conf
options lnet networks=tcp1(eth1)

# For IB
root@st15-mds1 ~]# cat /etc/modprobe.d/lustre.conf
options lnet networks=o2ib(ib0)
Make sure YOU DO NOT do the following:
- Do NOT use or enable the EPEL repos
- Do NOT install CMAN (Cluster Manager)
- Do NOT configure crossover cable interfaces
- Do NOT configure Lustre, Corosync or Pacemaker
- Do NOT configure NTP time synchonisation
LVM on the Nodes
Setup the LVM partitions (Note: this was done on a local system, not in the lab, below is not HA stuff)
Start off with pvcreate
  pdsh -w blade[1-5] pvcreate /dev/sdb
  pdsh -w blade[1-5] pvcreate /dev/sdc
  pdsh -w blade[1-5] pvcreate /dev/sdd
  pdsh -w blade[1-5] pvcreate /dev/sde
  pdsh -w blade[1-5] pvcreate /dev/sdf
Then for the MDS
vgcreate vg_mds /dev/sdb /dev/sdc /dev/sdd /dev/sde /dev/sdf
lvcreate -L 1T -i 5 -I 4k -n lv_mdt vg_mds
lvcreate -L 10G -i 5 -I 4k -n lv_mgt vg_mds
Then for the OSS
vgcreate vg_oss /dev/sdb /dev/sdd /dev/sdc /dev/sde /dev/sdf
lvcreate -L 4T -i 5 -n lv_ost vg_oss
Install the MDS / OSS nodes
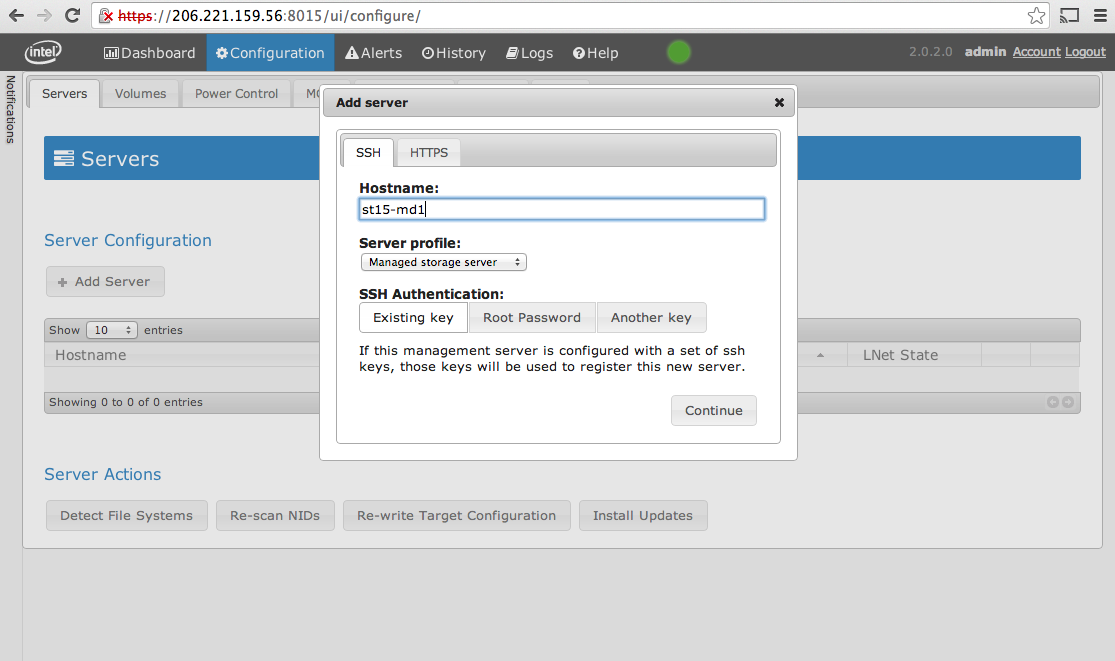
- Go to the IML interface (Assuming you have all the dos and donts completed above)
- Login with the details provided during the installation (so admin/admin as above)
- Once logged in Click on the Configuration tab, then Add Server
 http://wiki.bostonlabs.co.uk/w/images/4/44/Ieel_installation_add_server.png
Alternatively, you can do this using the CLI:
# This is how it starts off, providing a list of jobs to complete
[root@st15-iml1 ~]# chroma --username admin --password admin server-add st15-oss1 --server_profile base_managed
Setting up host st15-oss1, waiting on jobs: [13]

# Then once finished
[root@st15-iml1 ~]# chroma --username admin --password admin server-add st15-oss1 --server_profile base_managed
Setting up host st15-oss1: Finished
Setup the Lustre FS
To start with, lets setup the MGT
- Go to the Web Interface again
- Click on Configuration, then MGT
- Click on 'Select Storage, then select the MGT volume from the list, Then create new MGT
Next up, lets create the File System
- Note: Give the filesystem a descriptive name, dont just call it lustre as it'll confuse the hell out of you!
- Go to the Web Interface
- Click on Configuration, then File System
- Go through the options presented (with a descriptive fs name such as lustrefs01

Verify the Setup
Verify the servers in Chroma
[root@st15-iml1 ~]# chroma server list
| id |    fqdn   |  state  |       nids       |
| 1  | st15-mds1 | lnet_up | 10.10.115.1@tcp1 |
| 2  | st15-mds2 | lnet_up | 10.10.115.2@tcp1 |
| 3  | st15-oss1 | lnet_up | 10.10.115.3@tcp1 |
| 4  | st15-oss2 | lnet_up | 10.10.115.4@tcp1 |
Verify the Volumes in Chroma
[root@blade10 ~]# chroma volume-list
| id |      name     |   size  |             primary              | failover |      status     |
| 36 | vg_mds-lv_mgt | 10.0GiB | blade1:/dev/mapper/vg_mds-lv_mgt |          | configured-noha |
| 37 | vg_mds-lv_mdt |  1.0TiB | blade1:/dev/mapper/vg_mds-lv_mdt |          | configured-noha |
| 38 | vg_oss-lv_ost |  4.0TiB | blade2:/dev/mapper/vg_oss-lv_ost |          | configured-noha |
| 39 | vg_oss-lv_ost |  4.0TiB | blade3:/dev/mapper/vg_oss-lv_ost |          | configured-noha |
This is what we had preconfigured in the lab at Intel
root@st15-iml1 ~]# chroma volume-list
| id |  name  |   size  | filesystem_type |                          primary                          |                          failover                         |     status    |
| 1  | 150001 | 10.0GiB |       None      | st15-mds1:/dev/disk/by-id/scsi-0QEMU_QEMU_HARDDISK_150001 | st15-mds2:/dev/disk/by-id/scsi-0QEMU_QEMU_HARDDISK_150001 | configured-ha |
| 2  | 150002 |  1.0GiB |       None      | st15-mds2:/dev/disk/by-id/scsi-0QEMU_QEMU_HARDDISK_150002 | st15-mds1:/dev/disk/by-id/scsi-0QEMU_QEMU_HARDDISK_150002 | configured-ha |
| 3  | 150005 | 10.0GiB |       None      | st15-oss1:/dev/disk/by-id/scsi-0QEMU_QEMU_HARDDISK_150005 | st15-oss2:/dev/disk/by-id/scsi-0QEMU_QEMU_HARDDISK_150005 | configured-ha |
| 4  | 150004 | 10.0GiB |       None      | st15-oss2:/dev/disk/by-id/scsi-0QEMU_QEMU_HARDDISK_150004 | st15-oss1:/dev/disk/by-id/scsi-0QEMU_QEMU_HARDDISK_150004 | configured-ha |
| 5  | 150003 | 10.0GiB |       None      | st15-oss1:/dev/disk/by-id/scsi-0QEMU_QEMU_HARDDISK_150003 | st15-oss2:/dev/disk/by-id/scsi-0QEMU_QEMU_HARDDISK_150003 | configured-ha |
| 6  | 150006 | 10.0GiB |       None      | st15-oss2:/dev/disk/by-id/scsi-0QEMU_QEMU_HARDDISK_150006 | st15-oss1:/dev/disk/by-id/scsi-0QEMU_QEMU_HARDDISK_150006 | configured-ha |
Check out the SCSI Connectivity
Some notes about the failover pair of drives on the VM in the lab
  # From dmesg
  scsi2 : Virtio SCSI HBA
  scsi 2:0:0:0: Direct-Access     QEMU     QEMU HARDDISK    1.5. PQ: 0 ANSI: 5
  scsi 2:0:0:1: Direct-Access     QEMU     QEMU HARDDISK    1.5. PQ: 0 ANSI: 5
  ...
  sd 2:0:0:0: [sda] 20971520 512-byte logical blocks: (10.7 GB/10.0 GiB)
  sd 2:0:0:1: [sdb] 2097152 512-byte logical blocks: (1.07 GB/1.00 GiB)
  sd 2:0:0:0: [sda] Write Protect is off
  sd 2:0:0:0: [sda] Mode Sense: 63 00 00 08
  sd 2:0:0:1: [sdb] Write Protect is off
  sd 2:0:0:0: [sda] Write cache: enabled, read cache: enabled, doesn't support DPO or FUA
   sda:
  sd 2:0:0:1: [sdb] Mode Sense: 63 00 00 08
   unknown partition table
  sd 2:0:0:1: [sdb] Write cache: enabled, read cache: enabled, doesn't support DPO or FUA
  input: ImExPS/2 Generic Explorer Mouse as /devices/platform/i8042/serio1/input/input3
   sdb:
  sd 2:0:0:0: [sda] Attached SCSI disk
   unknown partition table
  sd 2:0:0:1: [sdb] Attached SCSI disk
  ...
  sd 2:0:0:0: Attached scsi generic sg0 type 0
  sd 2:0:0:1: Attached scsi generic sg1 type 0
Take a look at the SCSI devices on the nodes
root@st15-oss2 ~]#  cat /proc/scsi/scsi
Attached devices:
Host: scsi2 Channel: 00 Id: 00 Lun: 00
  Vendor: QEMU     Model: QEMU HARDDISK    Rev: 1.5.
  Type:   Direct-Access                    ANSI  SCSI revision: 05
Host: scsi2 Channel: 00 Id: 00 Lun: 03
  Vendor: QEMU     Model: QEMU HARDDISK    Rev: 1.5.
  Type:   Direct-Access                    ANSI  SCSI revision: 05
Host: scsi2 Channel: 00 Id: 00 Lun: 02
  Vendor: QEMU     Model: QEMU HARDDISK    Rev: 1.5.
  Type:   Direct-Access                    ANSI  SCSI revision: 05
Host: scsi2 Channel: 00 Id: 00 Lun: 01
  Vendor: QEMU     Model: QEMU HARDDISK    Rev: 1.5.
  Type:   Direct-Access                    ANSI  SCSI revision: 05
Have a look at the devices
[root@st15-oss2 ~]# cat /proc/scsi/sg/device_strs
QEMU    	QEMU HARDDISK   	1.5.
QEMU    	QEMU HARDDISK   	1.5.
QEMU    	QEMU HARDDISK   	1.5.
QEMU    	QEMU HARDDISK   	1.5.
Have a look at the sg map (mapping between devices and linux sg)
[root@st15-oss2 ~]# sg_map
/dev/sg0  /dev/sda
/dev/sg1  /dev/sdb
/dev/sg2  /dev/sdc
/dev/sg3  /dev/sdd
Getting IB to work
Intel EEL only provide the kernel package and not the kernel-devel package. For IB to work we need to rebuild MLNX_OFED.
- Get the kernel-devel RPM
  wget http://downloads.whamcloud.com/public/lustre/lustre-2.1.6/el6/server/RPMS/x86_64/kernel-devel-2.6.32-358.11.1.el6_lustre.x86_64.rpm
rpm -ivh kernel-devel-2.6.32-358.11.1.el6_lustre.x86_64.rpm --force- Rebuild Mellanox OFED
- Assuming were using MLNX_OFED_LINUX-2.0-2.0.5-rhel6.4-x86_64.iso
<syntaxhighlight>
 mkdir MLNX
 mount -o loop MLNX_OFED_LINUX-2.0-2.0.5-rhel6.4-x86_64.iso MLNX
 cd MLNX
 ./mlnx_add_kernel_support.sh -m .
 ## Output
 [root@blade1 MLNX]# ./mlnx_add_kernel_support.sh -m .
 Note: This program will create MLNX_OFED_LINUX TGZ for rhel6.4 under /tmp directory.
     All Mellanox, OEM, OFED, or Distribution IB packages will be removed.
 Do you want to continue?[y/N]:y
 See log file /tmp/mlnx_ofed_iso.8662.log
 Building OFED RPMs. Please wait...
 Removing OFED RPMs...
 C